Tag: Installation Process

  • Installation process as per IEC 62561

    The installation of a lightning protection system is a critical process that requires careful planning and adherence to safety standards. IEC 62561 is a standard that specifies the requirements for lightning protection system components, including their installation process. In this article, we will discuss the installation process as per IEC 62561 and the various steps involved in it.

    Step 1: Risk Assessment

    The first step in the installation process of a lightning protection system is to conduct a risk assessment. This assessment will determine the level of protection required for the structure and its contents. It will also identify potential hazards and the probability of a lightning strike.

    The risk assessment should take into account the following factors:

    • The height and shape of the structure
    • The materials used in the construction of the structure
    • The location and function of the structure
    • The type and value of the contents of the structure
    • The surrounding environment, including trees, power lines, and other structures
    • The local lightning frequency and intensity

    Once the risk assessment has been completed, the level of protection required for the structure can be determined. This will inform the design of the lightning protection system and the selection of appropriate components.

    Step 2: Design of the Lightning Protection System

    The next step in the installation process is the design of the lightning protection system. This involves selecting appropriate components and determining their placement on the structure.

    The lightning protection system consists of the following components:

    • Air termination system
    • Down conductor system
    • Earth termination system
    • Surge protection devices

    The air termination system consists of lightning rods or air terminals that are installed at the highest point of the structure. The air terminals are designed to intercept the lightning strike and conduct it to the down conductor system.

    The down conductor system consists of conductors that run from the air termination system to the earth termination system. The down conductors are designed to conduct the lightning strike safely to the earth.

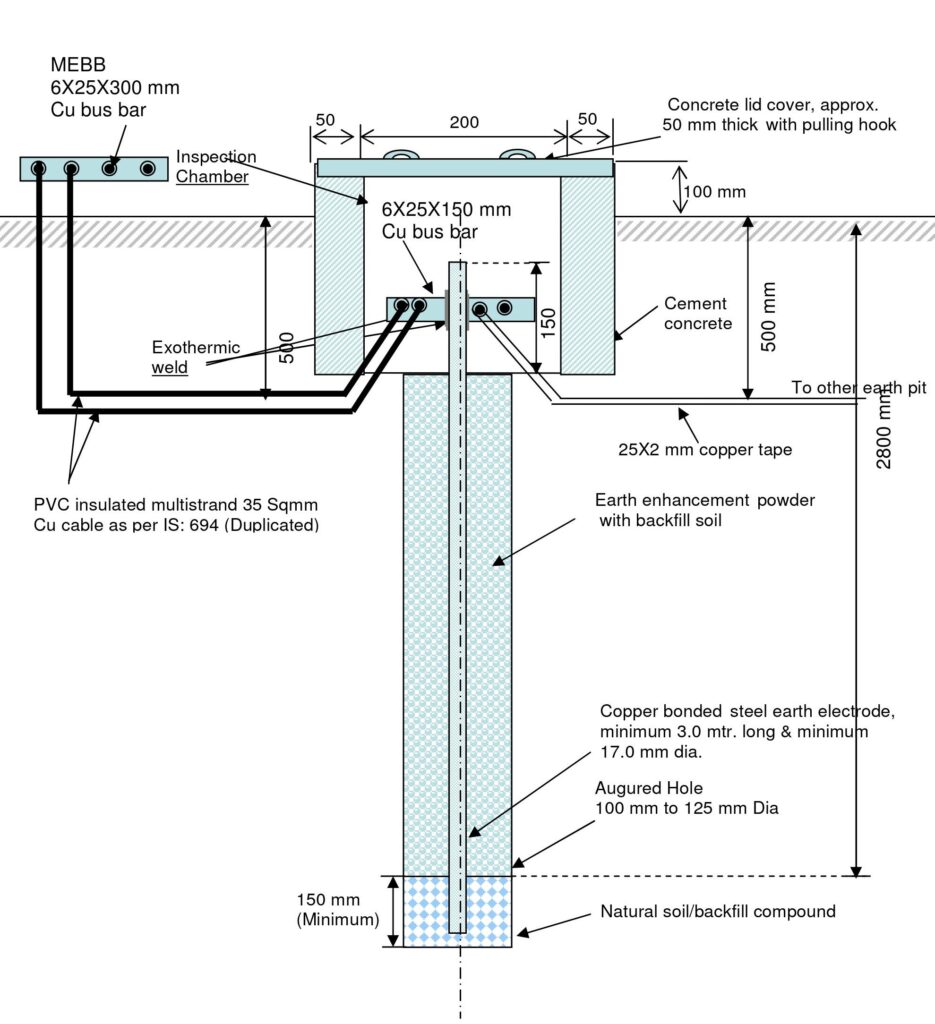
    The earth termination system consists of earth electrodes that are installed in the ground. The earth electrodes are designed to dissipate the lightning strike safely into the ground.

    Surge protection devices are installed at the point of entry of electrical and electronic equipment into the structure. These devices protect the equipment from voltage surges that can be caused by lightning strikes.

    The design of the lightning protection system must comply with the requirements of IEC 62561. The components must be selected based on their performance and safety requirements, and their placement must be determined based on the risk assessment.

    Step 3: Installation of the Lightning Protection System

    The installation of the lightning protection system must be carried out by qualified personnel who are familiar with the requirements of IEC 62561. The installation must comply with the relevant building codes and regulations.

    The installation process can be broken down into the following steps:

    • Installation of the air termination system
    • Installation of the down conductor system
    • Installation of the earth termination system
    • Installation of the surge protection devices

    Installation of the air termination system

    The air termination system is installed at the highest point of the structure. The air terminals must be installed in a manner that allows for the interception of the lightning strike. They must be spaced appropriately to ensure that the entire structure is covered.

    The air terminals must be securely fixed to the structure using appropriate fixings. They must be made of materials that are resistant to corrosion and mechanical damage. The air terminals must also be bonded to the down conductor system.

    Installation of the Down Conductor System

    The down conductor system is installed in a straight line from the air termination system to the earth termination system. The down conductors must be installed using appropriate fixings and must be secured to the structure at regular intervals.

    The down conductors must be made of materials that are resistant to corrosion and mechanical damage. They must also be bonded to the earth termination system and the surge protection devices. The down conductor system must also be installed in a manner that prevents water ingress and damage to the structure.

    Installation of the Earth Termination System

    The earth termination system is installed in the ground. The earth electrodes must be installed in a manner that ensures good electrical contact with the surrounding soil. The earth electrodes must be spaced appropriately to ensure that the entire lightning protection system is properly earthed.

    The earth electrodes must be made of materials that are resistant to corrosion and mechanical damage. They must also be bonded to the down conductor system and the surge protection devices.

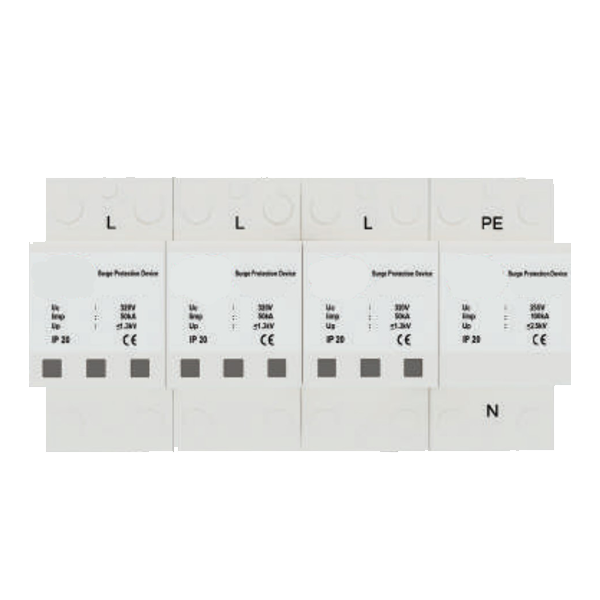
    Installation of the Surge Protection Devices

    The surge protection devices are installed at the point of entry of electrical and electronic equipment into the structure. The devices must be installed in a manner that ensures good electrical contact and proper bonding to the down conductor system and earth termination system.

    The surge protection devices must be selected based on their performance and safety requirements. They must be installed in accordance with the manufacturer’s instructions and the requirements of IEC 62561.

    Step 4: Testing and Inspection

    Once the lightning protection system has been installed, it must be tested and inspected to ensure that it is functioning properly. The testing and inspection process should be carried out by qualified personnel who are familiar with the requirements of IEC 62561.

    The testing and inspection process should include the following:

    • Verification of the components and their installation
    • Measurement of the earth resistance of the earth termination system
    • Measurement of the continuity of the down conductor system
    • Verification of the bonding between components
    • Verification of the surge protection devices

    Any deficiencies or faults in the lightning protection system must be identified and rectified before the system is put into service.

    Step 5: Maintenance

    The lightning protection system must be regularly maintained to ensure that it continues to function properly. The maintenance should be carried out by qualified personnel who are familiar with the requirements of IEC 62561.

    The maintenance should include the following:

    • Inspection of the components for signs of damage or corrosion
    • Inspection of the fixings and connections for tightness and security
    • Measurement of the earth resistance of the earth termination system
    • Measurement of the continuity of the down conductor system
    • Verification of the bonding between components
    • Verification of the surge protection devices

    Any deficiencies or faults in the lightning protection system must be identified and rectified promptly to ensure that the system continues to provide adequate protection.

    The installation process of a lightning protection system must be carried out carefully and in accordance with the requirements of IEC 62561. The process involves a risk assessment, design of the lightning protection system, installation of the components, testing and inspection, and maintenance.

    The lightning protection system must be installed by qualified personnel who are familiar with the requirements of IEC 62561. The components must be selected based on their performance and safety requirements, and their placement must be determined based on the risk assessment.

    Regular maintenance of the lightning protection system is critical to ensure that it continues to function properly. The maintenance should be carried out by qualified personnel and should include inspection of the components, measurement of the earth resistance and continuity of the down conductor system, and verification of the surge protection devices.

    Adherence to the requirements of IEC 62561 is critical to ensure that the lightning protection system provides adequate protection to the structure and its contents. By following the installation process as per IEC 62561, the risk of damage or injury due to lightning strikes can be greatly reduced.

  • Installation process as per NFC 17102

    The installation process as per NFC 17 102 2011 is a comprehensive guide that outlines the steps and procedures involved in the installation of lightning protection systems. This standard is used in many countries around the world, including France, and is designed to ensure that lightning protection systems are installed correctly and effectively. In this article, we will explore the installation process as per NFC 17 102 2011, including the steps involved and the requirements for each step.

    Overview of NFC 17 102 2011

    Before diving into the installation process, it is important to understand what NFC 17 102 2011 is and why it is important. This standard, also known as the French National Standard for Lightning Protection, provides guidelines for the design, installation, and maintenance of lightning protection systems. The standard applies to all types of structures, including buildings, bridges, and towers.

    The NFC 17 102 2011 standard is based on the principle of the Faraday cage, which is a conductive enclosure that protects the interior from external electrical fields. The standard recommends the installation of a lightning protection system that is designed to intercept lightning strikes and conduct the electrical current safely to the ground.

    Steps in the Installation Process

    The installation process as per NFC 17 102 2011 involves several steps that are designed to ensure that the lightning protection system is installed correctly and effectively. These steps are as follows:

    Site Survey

    The first step in the installation process is to conduct a site survey. This involves an inspection of the structure to determine the best location for the lightning protection system. The survey should take into account the height of the structure, the location of any metal objects, and the soil conditions.

    Design

    Once the site survey is complete, the lightning protection system can be designed. The design should take into account the size and shape of the structure, the local lightning density, and the protection level required. The design should also comply with the requirements of NFC 17 102 2011 and any other relevant standards.

    Installation of Air Terminals

    The next step is to install the air terminals. These are the rods or other conductive elements that are installed on the roof of the structure. The air terminals are designed to intercept the lightning strike and conduct the electrical current safely to the ground. The installation of air terminals should be done in accordance with the design and the requirements of NFC 17 102 2011.

    Installation of Down Conductors

    The down conductors are the vertical conductive elements that connect the air terminals to the ground. The down conductors should be installed in a straight line, without any sharp bends or kinks. The installation of down conductors should also comply with the requirements of NFC 17 102 2011.

    Installation of Grounding System

    The grounding system is the final part of the lightning protection system. It is designed to provide a safe path for the electrical current to dissipate into the ground. The grounding system should be installed in accordance with the design and the requirements of NFC 17 102 2011. The grounding system should also be tested to ensure that it is working correctly.

    Requirements for Each Step

    In addition to the steps involved in the installation process, there are also specific requirements for each step. These requirements are designed to ensure that the lightning protection system is installed correctly and effectively. The requirements for each step are as follows:

    Site Survey Requirements:

    • The site survey should be carried out by a qualified and experienced professional.
    • The survey should take into account the height of the structure, the location of any metal objects, and the soil conditions.
    • The survey should be documented in a report that includes recommendations for the design of the lightning protection system.

    Design Requirements:

    • The lightning protection system design should be carried out by a qualified and experienced professional.
    • The design should take into account the size and shape of the structure, the local lightning density, and the protection level required.
    • The design should comply with the requirements of NFC 17 102 2011 and any other relevant standards.
    • The design should include the location of the air terminals, down conductors, and grounding system.

    Air Terminal Installation Requirements:

    • The air terminals should be installed in accordance with the design and the requirements of NFC 17 102 2011.
    • The air terminals should be spaced no more than 20 meters apart.
    • The air terminals should be installed on the highest points of the structure and should be at least 1 meter above the roof.

    Down Conductor Installation Requirements:

    • The down conductors should be installed in a straight line, without any sharp bends or kinks.
    • The down conductors should be installed at least 50 cm away from the building’s exterior walls.
    • The down conductors should be connected to the air terminals with suitable connectors.
    • The down conductors should be made of a conductive material that meets the requirements of NFC 17 102 2011.

    Grounding System Installation Requirements:

    • The grounding system should be installed in accordance with the design and the requirements of NFC 17 102 2011.
    • The grounding system should be tested to ensure that it has a low resistance to earth.
    • The grounding system should be installed in an area that is not subject to flooding or waterlogging.
    • The grounding system should be connected to the down conductors with suitable connectors.
      Advantages of NFC 17 102 2011

    The NFC 17 102 2011 standard has several advantages when it comes to the installation of lightning protection systems. These advantages include:

    Clear Guidelines: NFC 17 102 2011 provides clear guidelines for the design, installation, and maintenance of lightning protection systems. This makes it easier for professionals to install the system correctly and effectively.

    High Protection Level: NFC 17 102 2011 requires lightning protection systems to provide a high level of protection against lightning strikes. This helps to ensure that the structure and its occupants are safe in the event of a lightning strike.

    International Standard: NFC 17 102 2011 is an international standard that is used in many countries around the world. This means that lightning protection systems installed according to the standard are likely to meet the requirements of other countries as well.

    Reliable Performance: NFC 17 102 2011 requires lightning protection systems to be designed and installed in a way that ensures reliable performance. This helps to reduce the risk of system failure and ensures that the system is effective in protecting the structure.

  • Installation of ESE Lightning protection

    Lightning strikes can cause significant damage to buildings and structures, resulting in costly repairs and downtime. The installation of a lightning protection system is critical to protect against the unpredictable and potentially dangerous effects of lightning strikes. One type of lightning protection system is the Early Streamer Emission (ESE) lightning protection system. In this article, we will discuss the installation process of the ESE lightning protection system and the advantages it offers over other types of systems. We will also explore the benefits of using maintenance-free chemical earthing instead of traditional earthing methods.

    What is an ESE Lightning Protection System?

    An ESE lightning protection system is designed to protect buildings and structures from direct and indirect lightning strikes. It works by emitting a streamer, which is an ionized channel that is capable of attracting lightning strikes. The ESE lightning protection system has a unique design that enables it to emit the streamer earlier than other types of systems, giving it an advantage in attracting lightning strikes.

    Installation Process of ESE Lightning Protection System

    The installation process of an ESE lightning protection system is similar to that of a conventional system. However, there are some differences due to the unique design of the ESE system. The installation process typically involves the following steps:

    Step 1: Site Assessment

    The first step in the installation process is a site assessment. This involves assessing the building or structure to determine the level of protection required. The assessment takes into account the size and shape of the building, the location, and the surrounding environment. The assessment is critical to ensuring that the ESE lightning protection system is designed to provide the necessary level of protection.

    Step 2: Design

    Once the site assessment is complete, the design of the ESE lightning protection system can begin. The design takes into account the results of the site assessment and is tailored to the specific needs of the building or structure. The design includes the placement of air terminals, conductors, and grounding system.

    Step 3: Installation of Air Terminals

    The air terminals are the most visible part of the lightning protection system. They are installed on the roof of the building or structure and are designed to attract lightning strikes. The air terminals are typically made of SS Metal.

    Step 4: Installation of Conductors

    The conductors are the cables that connect the air terminals to the grounding system. They are designed to conduct the electrical charge from a lightning strike safely into the ground. The conductors are typically made of copper or aluminum and are installed along the roof and down the sides of the building.

    Step 5: Installation of Grounding System

    The grounding system is designed to provide a path for the electrical charge from a lightning strike to safely dissipate into the ground. The grounding system typically consists of grounding rods and conductors that are buried in the ground. The grounding rods are installed at a sufficient depth to ensure a good connection with the soil.

    Advantages of ESE Lightning Protection System

    There are several advantages to using an ESE lightning protection system over other types of systems. These include:

    Early Streamer Emission

    The unique design of the ESE system enables it to emit a streamer earlier than other types of systems. This gives it an advantage in attracting lightning strikes, providing an extra layer of protection.

    High Level of Protection

    The ESE lightning protection system is designed to provide a high level of protection to buildings and structures. It is capable of protecting against direct and indirect lightning strikes, reducing the risk of damage and downtime.

    Low Maintenance

    The ESE lightning protection system requires little maintenance once it is installed. The air terminals and conductors are designed to withstand the elements and do not require regular maintenance.

    Cost-effective

    The ESE lightning protection system is a Cost-effective Lightning Protection Solution with Maintenance-Free Chemical Earthing.

    In addition to the advantages of the ESE lightning protection system, there is another important aspect of lightning protection that should be considered: earthing. Earthing is the process of providing a path for the electrical charge from a lightning strike to safely dissipate into the ground. The traditional method of earthing involves using a grounding rod or plate that is buried in the ground. However, this method can be unreliable and requires regular maintenance to ensure a good connection with the soil.

    A more modern and effective approach to earthing is the use of maintenance-free chemical earthing. This involves using a conductive compound that is mixed with the soil to create a low-resistance earth pit. The compound is designed to provide a permanent and reliable connection between the grounding system and the soil, reducing the need for regular maintenance.

    Benefits of Maintenance-Free Chemical Earthing

    There are several benefits to using maintenance-free chemical earthing over traditional earthing methods:

    Reliable Connection

    Maintenance-free chemical earthing provides a reliable connection between the grounding system and the soil. This ensures that the electrical charge from a lightning strike is safely dissipated into the ground, reducing the risk of damage and downtime.

    Low Maintenance

    Maintenance-free chemical earthing requires little to no maintenance once it is installed. This reduces the need for regular inspections and ensures that the grounding system is always functioning properly.

    Longevity

    Maintenance-free chemical earthing has a long lifespan, typically lasting for more than 20 years. This means that it is a cost-effective solution that requires minimal maintenance over its lifespan.

    Cost-effective

    Maintenance-free chemical earthing is a cost-effective solution that can save money in the long run. It requires minimal maintenance and has a long lifespan, reducing the need for expensive repairs and replacements.

    In conclusion, the installation process of an ESE lightning protection system involves several steps, including site assessment, design, installation of air terminals, conductors, and grounding system. The ESE lightning protection system offers several advantages, including early streamer emission, high level of protection, low maintenance, and cost-effectiveness.

    In addition to the ESE lightning protection system, the use of maintenance-free chemical earthing can provide a reliable and cost-effective solution for earthing. Maintenance-free chemical earthing offers several benefits over traditional earthing methods, including reliability, low maintenance, longevity, and cost-effectiveness.

    By combining the installation of an ESE lightning protection system with maintenance-free chemical earthing, building owners and operators can ensure that their structures are protected against lightning strikes while minimizing the need for regular maintenance and expensive repairs.

  • Installation process of conventional LPS

    Lightning strikes can cause extensive damage to buildings and other structures. Fortunately, the installation of a conventional LPS (lightning protection system) can mitigate the risks associated with lightning strikes. The installation process involves a series of steps that are designed to ensure the safety and protection of the structure. In this article, we will discuss the installation process of a conventional lightning protection system in detail.

    Step 1: Site Assessment

    The first step in the installation process of a conventional lightning protection system is to conduct a site assessment. This assessment involves the evaluation of the structure to be protected, including its size, shape, and height. The site assessment also considers the type of roof, the nature of the soil, and the presence of any metallic objects in the vicinity of the structure.

    The site assessment is typically carried out by a qualified professional, who has expertise in the design and installation of lightning protection systems. The purpose of the site assessment is to identify the risks associated with lightning strikes and to develop a design that provides adequate protection to the structure.

    Step 2: Design of the Lightning Protection System

    The design of the lightning protection system is critical to its effectiveness. The design process involves the selection of appropriate materials and components, including air terminals, conductors, and grounding systems. The design must also take into account the specific requirements of the structure and the applicable building codes and standards.

    The air terminals, which are also known as lightning rods, are typically made of copper or aluminum and are installed on the roof of the structure. The air terminals intercept the lightning strikes and channel the electrical charge through the conductors to the grounding system. The conductors are usually made of copper or aluminum and are installed on the roof and sides of the structure. The grounding system, which consists of a series of copper or aluminum rods driven into the earth, provides a low-resistance path for the electrical charge to dissipate safely into the ground.

    The design of the lightning protection system must take into account the potential for indirect lightning strikes, which can occur when lightning strikes nearby objects, such as trees or other buildings. The system must also be designed to protect against surges in power and other electrical disturbances.

    Step 3: Installation of Air Terminals

    The installation of air terminals is the next step in the installation process of a conventional lightning protection system. The air terminals are installed on the roof of the structure and are spaced at regular intervals. The number and placement of air terminals are determined by the size and shape of the structure and the local building codes and standards.

    The air terminals are typically attached to the roof using specialized clamps, which are designed to provide a secure and electrically conductive connection. The installation of air terminals must be carried out in a manner that does not damage the roof or the structural integrity of the building.

    Step 4: Installation of Conductors

    Once the air terminals are installed, the next step is to install the conductors. The conductors are used to carry the electrical charge from the air terminals to the grounding system. The conductors are installed on the roof and sides of the structure, and are typically attached to the air terminals using specialized fittings.

    The conductors must be installed in such a way as to provide a continuous and electrically conductive path from the air terminals to the grounding system. The installation of conductors must be carried out in a manner that does not damage the roof or the structural integrity of the building.

    Step 5: Installation of Grounding System

    The final step in the installation process of a conventional lightning protection system is the installation of the grounding system. The grounding system provides a low-resistance path for the electrical charge to dissipate safely into the ground. The grounding system consists of a series of copper or aluminum rods that are driven into the earth at regular intervals.

    The number and size of the grounding rods are determined by the size and shape of the structure, the soil conditions, and the local building codes and standards. The grounding rods must be installed at a sufficient depth to ensure a good connection with the soil.

    The grounding rods are connected to the conductors using specialized fittings and connectors. The connection must be secure and electrically conductive to ensure that the electrical charge is safely dissipated into the ground.

    Step 6: Testing and Certification

    Once the lightning protection system is installed, it must be tested to ensure that it is functioning correctly and providing adequate protection to the structure. The testing process involves the use of specialized equipment to measure the electrical resistance of the system and to verify that the system is grounded properly.

    The testing must be carried out by a qualified professional, who has expertise in the design and installation of lightning protection systems. The testing process typically involves the use of specialized equipment, such as a megohmmeter, to measure the electrical resistance of the system.

    Once the testing is complete, the lightning protection system must be certified by a qualified professional. The certification process involves the verification that the lightning protection system is in compliance with local building codes and standards and is providing the necessary level of protection to the structure.

    Step 7: Maintenance and Inspection

    The maintenance and inspection of a conventional lightning protection system are critical to its effectiveness. The system must be inspected and maintained regularly to ensure that it is functioning correctly and providing adequate protection to the structure.

    The maintenance of the lightning protection system involves inspecting the air terminals, conductors, and grounding system for any damage or wear and tear. Any damaged components must be repaired or replaced immediately to ensure the system continues to provide adequate protection.

    It is also important to keep trees and other vegetation away from the air terminals, conductors, and grounding system. Trees can grow and come into contact with the air terminals and conductors, which can cause damage to the system or interfere with its operation.

    In addition to regular maintenance, it is important to have the lightning protection system inspected and tested periodically by a qualified professional. This will ensure that the system is in compliance with local codes and standards and is providing the necessary level of protection.

    Installing a conventional lightning protection system is an important step in protecting your building or structure from the damaging effects of lightning strikes. The installation process involves a site assessment, design of the system, installation of air terminals, conductors, and grounding system, and testing and maintenance.

    It is important to work with a qualified professional to ensure that the lightning protection system is designed and installed correctly and is in compliance with local codes and standards. Regular maintenance and periodic inspections are also necessary to ensure that the system is functioning correctly and providing the necessary level of protection.

    Investing in a conventional lightning protection system can save you from costly damage and downtime due to lightning strikes. By following the proper installation and maintenance procedures, you can ensure that your building or structure is protected from the unpredictable and potentially dangerous effects of lightning.

  • How to Install Maintenance-free chemical earthing?

    Maintenance-free chemical earthing installation process

    Chemical earthing is an advanced grounding method that utilizes chemical compounds to establish a low-resistance pathway to the Earth. It is designed to provide a long-lasting and hassle-free earthing solution. The chemical mix used in this type of earthing system comprises graphite and other conductive materials that facilitate the flow of electrical current. Due to its low-maintenance nature and durability, chemical earthing is becoming increasingly popular as an alternative to conventional earthing systems.

    Location for Earth

    • Earth electrodes are best situated in low-lying areas that are in close proximity to the building or equipment.
    • It is advisable to place the electrodes near existing water bodies or water points, but not in naturally well-drained areas.
    • It is not recommended to install earthing electrodes in dry sand, limestone, granite, or any other stony ground.
    • It is important to avoid high banks or man-made soil when installing the earthing electrode.

    Components of Earthing & Bonding system

    The Earthing & Bonding system comprises several essential components, including the Earth electrode, Earth enhancement material, Earth pit, Equi-potential earth busbar, connecting cable, tape/strip, and various other associated accessories. Each of these components plays a crucial role in ensuring the safe and efficient operation of electrical systems.

    Design of Earthing & Bonding system

    Earth Electrode

    The Earth Electrode is a vital component of the earthing system, which is responsible for creating a low resistance path to the Earth. It is typically made of high tensile low carbon steel circular rods that are molecularly bonded with copper on the outer surface. The copper-bonded steel cored rod is preferred due to its superior strength, corrosion resistance, low resistance path to earth, and cost-effectiveness.

    To ensure optimal performance, the Earth Electrode must meet specific requirements. It should be at least 17.0mm in diameter and a minimum of 3.0mtrs long. Additionally, the minimum copper bonding thickness should be 250 microns.

    To ensure the quality of the Earth Electrode, it can be visually inspected and checked for dimensions and thickness of copper coating using a micron gauge. This ensures that the electrode is up to standard and can perform its role effectively in the earthing system.

    Earth Enhancement material

    Earth enhancement material is a substance that enhances the effectiveness of earthing systems, especially in areas where the soil conductivity is poor, such as sandy, rocky or areas with varying moisture levels. It is designed to improve the conductivity of the earth electrode and the ground contact area. The ideal earth enhancement material should possess certain characteristics, such as high electrical conductivity, good water retention capacity, low corrosivity, and compatibility with the soil. It shall have following characteristics-

    The ideal earth enhancement material is a mixture of graphite and Portland cement, with minimal bentonite content. It should conform to the standards of IEC 62561-7 and ASTM G57-06. This material should have a high level of conductivity, which enhances the ability of the earth electrode to absorb power and retain humidity. Moreover, it should be non-corrosive, have low water solubility, but highly hygroscopic. It must be suitable for installation in dry form or slurry form and should not require the continuous presence of water to maintain its conductivity. It should not dissolve, decompose, or leach out over time, and should not require periodic charging treatment or maintenance.

    This earth enhancement material should be compatible with all types of electrodes and soil of varying resistivity. It should also be environmentally friendly, causing no pollution to the soil or local water table, and it should not be explosive. Additionally, it should not cause burns, irritations to the eye or skin, or any other health hazards. Overall, the earth enhancement material should be effective, safe, and sustainable for long-term use in the earthing and bonding system.

    Construction of unit earth pit:

    To install an earth electrode, a hole with a diameter of 100mm to 125mm is dug to a depth of approximately 2.8 meters. The electrode is then inserted into the hole and gently driven into the soil. At least 150mm of the electrode should be inserted into the natural soil.

    Earth enhancement material, in slurry form and weighing a minimum of approximately 30-35 kg, is then filled into the hole and allowed to set. Once set, the composite structure (earth electrode + earth enhancement material) should have a minimum diameter of 100mm, covering the entire length of the hole. The remaining portion of the hole is then filled with backfill soil.

    To connect the electrode to the main equi-potential earth busbar in the equipment room and other earth pits, if any, a copper strip measuring 150mmX25mmX6mm is exothermically welded to the main earth electrode. The main earth pit should be located as close as possible to the main equi-potential earth busbar in the equipment room.

    Construction of loop Earth by providing multiple earth pits

    In certain areas, it may not be possible to achieve an acceptable level of earth resistance with just one earth pit due to high soil resistivity. In such cases, a loop earth system consisting of multiple earth pits should be constructed. The number of pits required should be determined based on the resistance achieved from the previously installed earth pits.

    The same procedure as mentioned for a single earth pit should be followed for each additional earth pit. The distance between two successive earth electrodes should be a minimum of 3 meters and a maximum of twice the length of the earth electrode, which is around 6 meters.

    After installation, the earth pits should be interlinked using 25x2mm copper tape, and an exothermic welding technique should be used to make the connection. The interconnecting tape should be buried at a depth of no less than 500mm below the ground level and covered with an earth enhancement compound. This loop system ensures that the electrical potential is equalized across all the earth pits and minimizes the risk of electrical hazards.

    Maintenance-free chemical earthing installation process

    Measurement of Earth resistance

    The effectiveness of the earthing system is determined by measuring the earth resistance at the Main Equi-potential Earth Busbar (MEEB) using the Fall of Potential method. It is essential to have the installation process of the maintenance-free chemical earthing system carried out by qualified professionals with expertise in earthing system design and installation. This will guarantee that the system is correctly installed, operates securely, and functions consistently throughout its life cycle. As a result, it is recommended to hire certified professionals with the required skills and experience to install the earthing system.